
Landscape photography is all about capturing the beauty of nature in a photograph. This can be done in many ways, but one of the most important aspects is the lighting. In order to create stunning landscape photos, you need to know how to use natural light to your advantage.
In this article, we will discuss how to use natural light for landscape photography lighting. And we’ll provide you with some tips on how to get the most out of this type of lighting. So if you are interested in learning more, keep reading!
Types of Landscape Photography Lighting: The 8 Types of Natural Light
The rule of thumb for landscape photography is to shoot around sunset and sunrise. But other types of light can also produce great photos.
It’s a rare case when the light is so bad you can’t use if for anything.
1. Side Lighting During the Golden Hour
Side lighting is the most obvious choice for landscape photography. It reveals textures and structures, paints contrast and volume, and brings out colors.
This type of light is best during the so-called golden hour. Up to one hour after sunrise and up to one hour before sunset.
The name golden light refers to its transformation from red to yellow, going through all shades of orange.
Another benefit of this light is the fact that it creates long shadows that you can use for composition.
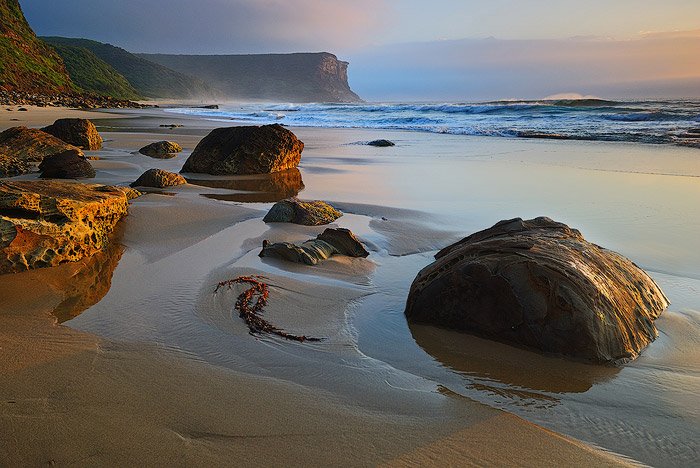
You can use this light to reveal shapes and textures in your landscapes.
Walk around your subject and try photographing it from different angles. Even a small shift can produce another lighting pattern during the golden hour.
This light is the best light for photography in general. And for landscape photography in particular.
2. Why You Should Pick Sunrise Light Over Sunset Light
Aren’t these the same thing? Well, no.
Sunset and sunrise light are similar, but they are not identical for many reasons. The main one is light direction. In the morning, the light is coming from the East, and in the afternoon from the West.
This will affect which part of your scene will look best.
Figuring this out is easy. Use maps or specialised apps like suncalc.net. These show the light source’s exact direction.
Another thing to consider is the clarity. Light is clearer during sunrise than during sunset. This is because the ground heats up during the day, stirring up particles or creating haze.
This is also why sunset light is usually redder.
3. Back Lighting
This type of light is more challenging than others. It’s also more rewarding.
There are two main challenges with backlighting. The contrast is much higher in this scenario. The sky is bright because of the sun.
And this causes the second drawback. Sun glares will appear on your lens.
This type of light does bring out the most contrast. But it also highlights textures, lightens object edges and increases the saturation.

To fix high contrast you have three options: underexposure, bracketing, filters.
Modern cameras have a high dynamic range. You can expose for the sky and then bring up the shadows in editing.
Another option is to use exposure bracketing and then combine the frames into one shot later. The last option is to use graduated filters.
To fix lens glare, you need to clean your lenses before shooting with backlighting. Every dust particle becomes enormous when lit.
Also, changing angle a bit can help you reduce the size of the flares or get rid of them altogether.
You also can take a few shots covering the Sun with your finger. And then combine shots with and without the Sun later in editing.
4. Front Lighting
As a general rule, you should avoid front lighting when shooting landscapes. The image may look bright and vivid to you but that’s it. There are no other advantages.
The light source fills all the shadows and removes them. Without the shadows, there is no contrast. Your image will look flat, with no depth.
You’ll also see your shadow in the picture, which looks amateurish.
In case the desired scene forces you to make a shot with front lighting, step to the side.
Shift your camera a bit so it’s more of a side light. There is no way to make a good shot with the light source behind you.
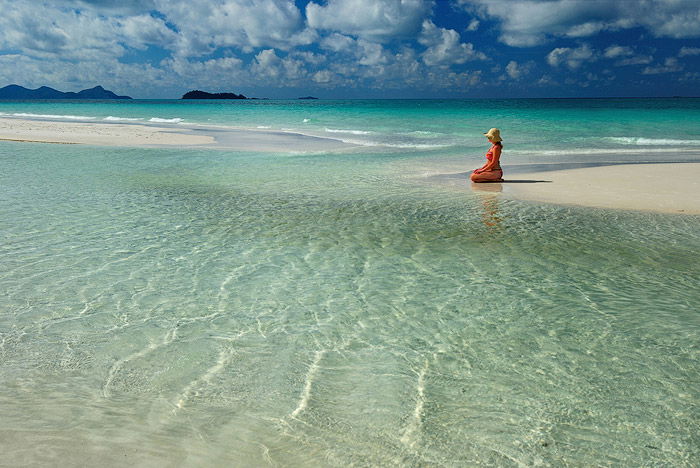
5. Top Lighting
Most lighting guides will tell you to stay away from midday photos. Only shoot around sunset or sunrise and put away your camera for the rest of the day.
Let’s shatter this myth.
There are specific scenarios when top lighting is better than any other type of light. This light is excellent for shooting beaches and water in general.
Water doesn’t have any shadows. Instead, it has beautiful glares and light play. Top lighting fills all the shadows on the sand, making it look flat and yellow and welcoming.
All those paradise shots you have seen were shot during daylight. You are getting a blue sky, intense colors in the water, flat beach – perfect conditions.
Although, you should avoid any solid objects like rocks, cliffs, etc.
6. Overcast Diffused Light
Some types of landscapes are best shot during this type of light. And you should avoid them during other lighting conditions.
I’m talking about forests and waterfalls.
Of course, sometimes you can shoot a forest with an intense light producing rays. But you need some excellent haze for that.
It usually only lasts for minutes, and then the light is too harsh and sharp.
You need soft diffused light for anything relating to trees. All those branches, leaves, trunks, flowers need to play along and create a harmonious shot.
If you have some strong dark shadows, it becomes a total mess without any smoothness and fluidity.
Concentrate on textures, colors and tonal perspective. That’s how you make a great forest shot.
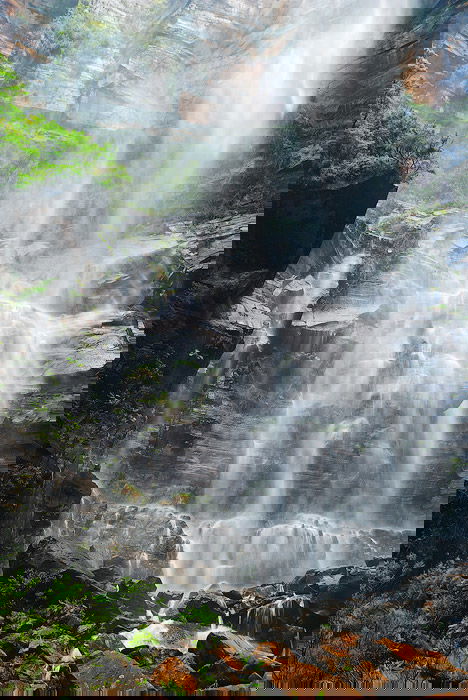
A waterfall during a typical day will look pretty to the naked eye. But any light patch transforms into a blown-out area on the photo. And this isn’t easy to fix.
You need a diffused soft light to show the water and the environment.
One other application of such light is a long exposure. You can shoot seascapes all day playing around with the shutter speed.
You can reach 0.5 or even 1 second during an overcast day. And you can train your skills with the flowing water.
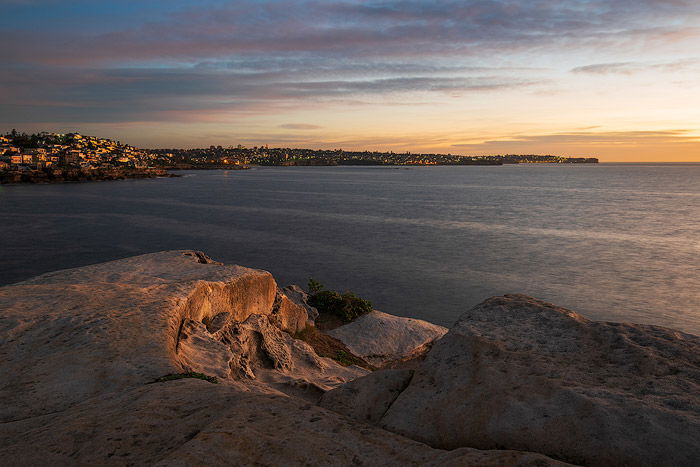
7. Skylight
Skylight is the best type of natural light you can get for your landscape photography. I’m talking about complete pre-sunrise (or post-sunset) darkness. The sky is reflecting and diffusing some light.
This light is very gentle and subtle yet strong enough to reveal all textures in the best possible way. It doesn’t produce harsh shadows and has a gentle color of the sky.
After a long exposure, the final photos have great contrast and colors.
Skylight is easy to spot if you turn off your torch or headlamp and have a look around at some solid surfaces. This is one of the reasons to arrive one hour before the sunrise and stay one hour after sunset.
Sometimes the sky is still much brighter. You need either a filter or bracketing to produce the final photo.
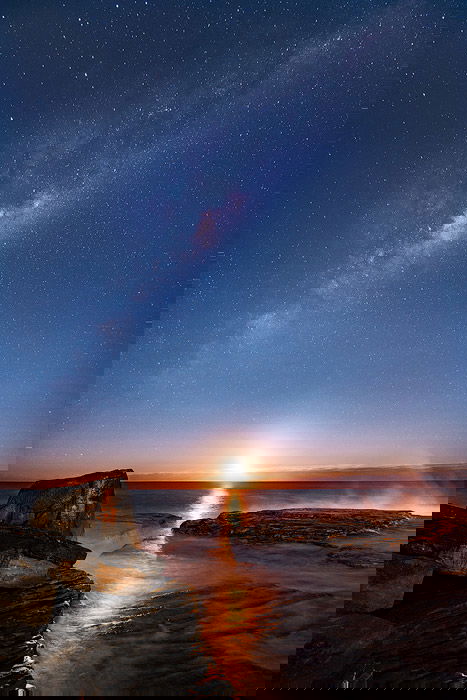
8. Moonlight
Moonlight is dim. But it has the same properties as sunlight. There is one big light source moving around the sky.
Shoot around moonrise and moonset to get some reddish color and longer shadows. The only significant difference is the light’s intensity. All your photos with the moon will be a long exposure.
Also, I recommend photographing when the moon isn’t full. The full moon is too bright compared to its surroundings and could be overexposed.
Also, the light of the full moon is too strong to see the stars. The best time to photograph the stars together with the moon is a quarter to half of its size.
You’ll see all the stars and Milky Way if it’s the right season.
Conclusion: Natural Light for Landscape Photography
Can we now decide what kind of natural light is best for landscape photography? Absolutely not. Sometimes it’s more favourable for a certain scene; sometimes you need something else.
Bookmark this guide and use it to plan your shoots beforehand. The best type of light will change based on your situation. But the more prepared you are, the more efficient your photography will be.
![]()
![]()
![]()
![]()


