There is a new Lightroom masking system. The selective adjustment tools in Lightroom got a major update when Adobe released version 11.0 in October 2021. This is the most significant change to the selective adjustment tools since they were added in 2008.
Don’t panic. The Adjustment Brush, Radial and Graduated filters are still there. They work a little differently, and it may take some time to get used to… but it is worth it!
The tools are integrated, and they are much more powerful working together. Adobe also added layer masking, making Lightroom look a little more like Photoshop. You also have two new powerful AI tools that will blow your mind!
Quickly select a sky or highlight your subject with one click. There is no messy work with the Brush tool. Let’s explore the new masking tools and see what all the buzz is about!
Using Lightroom Masking to Create Notable Changes with Lightroom Update
Selective edits appear in a layer panel you can move around the screen or dock in the column with the other editing tools. You can rename each edit to help you keep track of the masks.
Masking now works the same across all Lightroom apps. So, it does not matter if you are using Lightroom Classic, Lightroom CC, the Lightroom mobile app, or Adobe Camera Raw.
What are Selective Adjustments?
Lightroom lets you apply edits to selected areas of your photo. For instance, you can darken a bright spot or change the sky’s color temperature. The selected area is a ‘mask’.
If you are a Lightroom-only user, you may not be familiar with the term ‘masking‘. It is borrowed from Photoshop. Changes only apply to the areas highlighted by your selection. The other areas are hidden.
Think of a mask as a way of hiding or protecting areas that you do not want to change. The white areas of a mask are changed. The black areas are hidden.
Where to Find the New Masking Tool
There has been a subtle but important change in Lightroom’s Develop module. Under the Histogram, there is a row of icons. In previous versions, the tools from left to right were the following:
- Crop
- Healing Brush
- Red Eye Correction
- Radial Filter
- Graduated Filter
- Adjustment Brush
In version 11.0, you will find fewer tools visible with the new Mask tool:
- Crop
- Healing Brush
- Red Eye Correction
- Masking tool (housing the Radial Filter, Graduated Filter, and Adjustment Brush)
It is not just an organisational change. Various tools are now integrated with the Masking tool option.

How to Mask in Lightroom
Now let’s explore the selection process and the new tools. Choose the area that you want to change using one of the tools:
- Select a section by drawing a circle around it with the Radial Filter
- Drag a line in from the edge of the frame to create a Gradient Filter
- Paint the area you want to change using the Brush tool
- Select the sky or the subject of your image with the new Lightroom masks
The selection fades, or feathers, towards the edges to better integrate the changes into your photo. You can control the fade by moving the Feather slider. Higher feathering creates a more gradual fade.
Turn on the overlay by clicking the ‘O’ key to see the selected area.
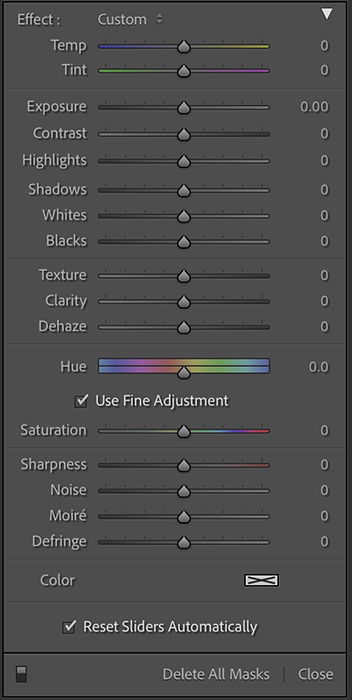
Once you have chosen an area to edit, a set of editing sliders appears. The sliders are mainly those found in the Basic panel. But they also include some other useful tools like sharpness. You can even add color to your selection.
How to Use the Lightroom Masking AI Tool
1. Menu With Tools
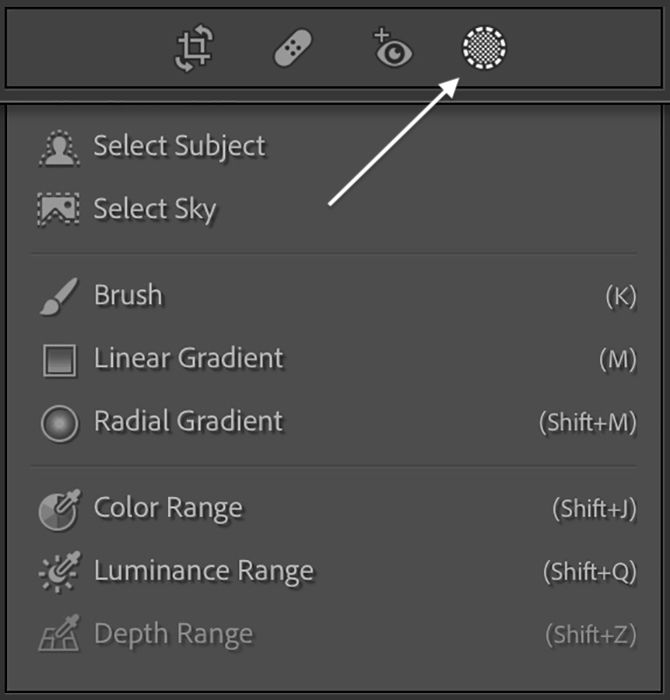
On the menu that appears, you will see the familiar Brush tool. The Graduated Filter is now the Linear Gradient tool. The Radial Filter is the Radial Gradient.
You will also see the Range Mask options of Color, Luminance, and Depth. These were included in previous versions of Lightroom Classic. But you could only access them after you had made a selection with one of the other tools.
You also have two new exciting AI tools:
- Select Subject
- Select Sky
2. Menu With Layer Masks
If there is already a selective edit in your photo, including those made in previous versions of Lightroom, the menu will look different. You will see the new masking panel that looks like Photoshop’s layer masks.
Each selective edit is on a layer. Double-click on a layer to rename it. This is a new feature of Lightroom masking. Renaming helps you keep track of the changes you have made.
At the top of the list, you have the Create New Mask option. This opens the selection tools menu.
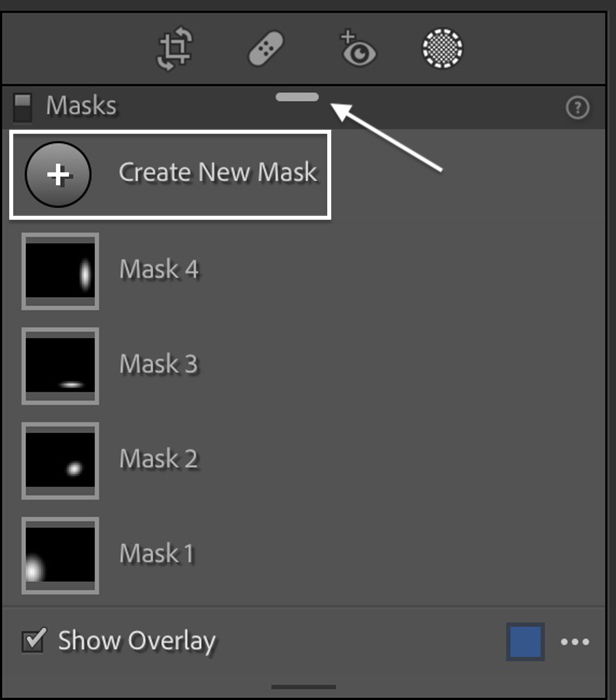
By default, the Layers panel opens just below the Histogram. You can move it by grabbing and dragging the handle at the top of the panel. This lets you see more layers. Double-click the handle to tuck it back into the column.
New Lightroom Masking Workflows
The workflows are a little different, even when using Lightroom’s legacy tools. Let’s look at how to use the following:
- Radial Gradient
- Changes in Range Mask tools
- New AI Sky and Subject selection tools
1. How to Use a Radial Gradient
Start by creating a new mask or selecting Radial Gradient from the list. Then draw your selection on your image. For Lightroom Classic users, this adds an extra step to your workflow.
As before, you can hide the shape by toggling the ‘H’ key. Toggle the overlay on and off using the ‘O’ key.
Also, you can drag pins on the outer circle to change the size of your selection. But now, there is also a pin on the inner circle that controls feathering.
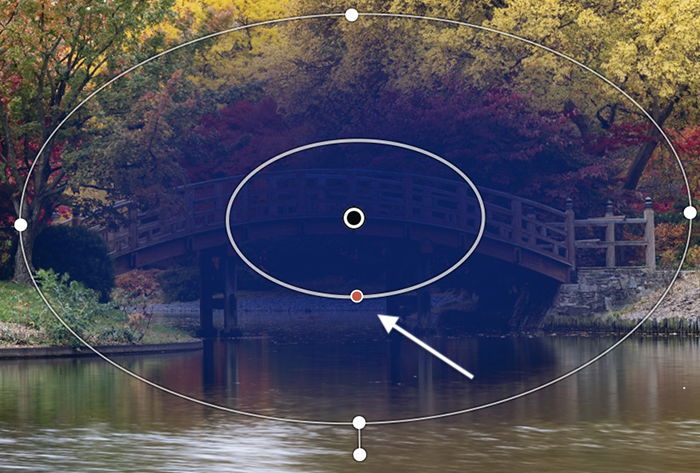
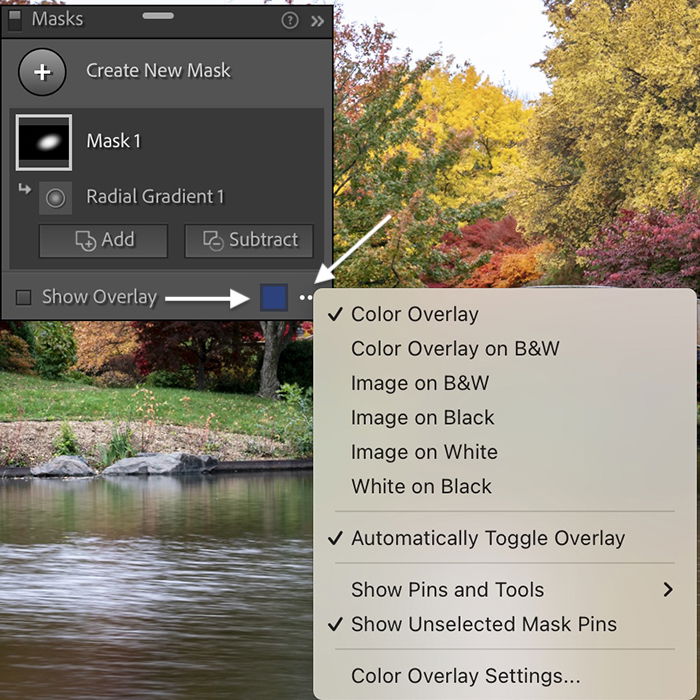
Click on the three dots at the bottom of the layer to open overlay options. Click on the colored square next to the dots to open the color picker.
You can select any color you want as your overlay. To invert, click the three dots next to the name of your selection, in this case, ‘Radial Gradient 1’. Choose Invert.
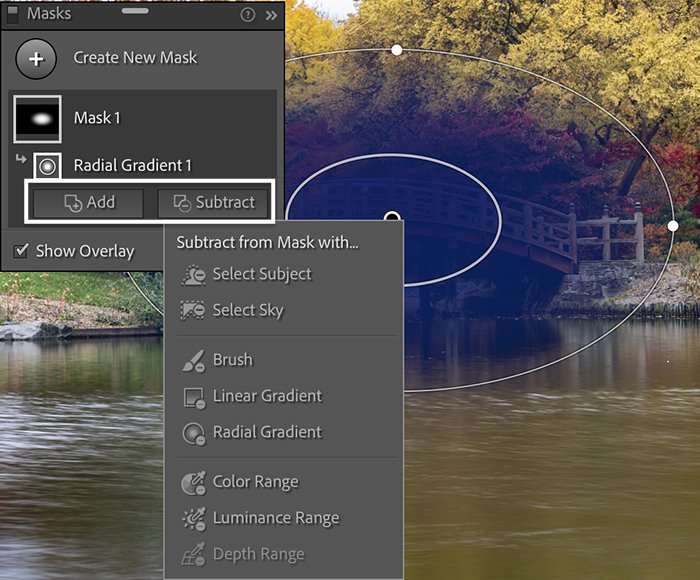
Under the mask layer, you have an Add and a Subtract button. If you do not see the buttons, click to expand the mask layer.
In previous versions, you could use the Brush tool to erase from a selection. You can still do that. But now, you can use any tool you want, not just the Brush.
In essence, you can add any tool to any other, including Range Masks. Or subtract tools from one another. Click Add or Subtract, and the tool menu appears. You can remove another Radial Gradient or take away a particular color using the Color Range tool.
A control panel lets you fine-tune the selection. Choose the Brush, and you will see familiar sliders that control flow and opacity. Choose Color or Luminance, and you can adjust the range. With all the tools, you can invert your selection.
Add or subtract as many times as you want with different tools. Under the main mask icon, each change you make is a layer. You can rename the sub-layers and toggle the changes on and off.
2. How to Use the Luminance Range Mask Tool
The Range Mask tools are not new to Lightroom Classic users. But you may not have used them before. They were tucked away at the bottom of the selective edits panel.
In previous versions, they worked in conjunction with the selective adjustment tools. First, you could add a Radial Filter. Then you could limit the selection based on luminance or color. If your image had focus information included, you could also select by depth.
In the new version of Lightroom, the Range Masks become powerful independent selection tools. Use Range Masks to select colors or brightness levels across the entire image.
New Way
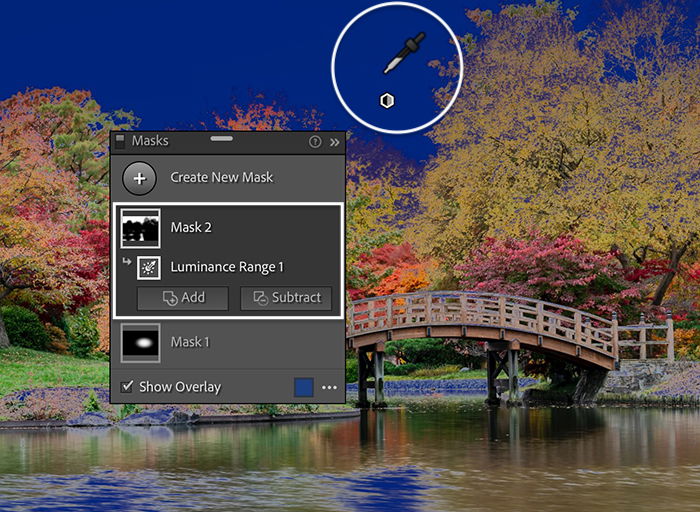
To select a brightness level, create a new mask and select the Luminance Range Mask. With the eyedropper, click on your image to choose a luminance value. All areas with the same brightness are activated.
You can adjust the selected tonal range using the slider in the Luminance panel. Add or subtract from your selection just as you did with the other tools.
Old Way
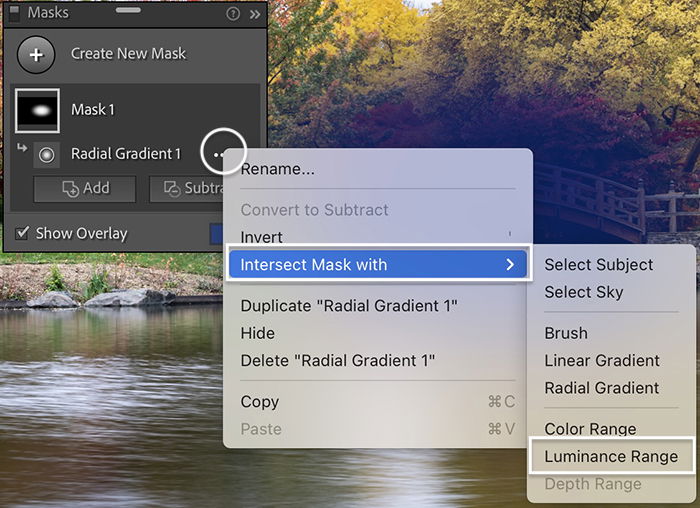
If you want to use Range Masks the same way you did in previous versions of Lightroom Classic, there is a slightly different workflow. All the functionality is still available. You just need to use the Intersect Mask option.
Create a Radial or Linear Gradient. Click the three dots next to the layer mask. Select ‘Intersect Mask With’. Then, choose the Range Mask you want to use.
From here, the process is the same as before. Select the color or luminance value you want to target. The Intersect Mask is only the selections that overlap from both masks.
3. How to Use Subject and Sky AI Masking Tools
We have saved the best for last. The two new powerful AI masking tools—Select Subject and Select Sky. These are a real game-changer in Lightroom.
Adobe has been adding AI tools to Photoshop. But the image processing engine of Lightroom and Adobe Camera Raw had to be redesigned to incorporate the AI.
With the new Select Subject tool, the AI analyses your image and chooses the most likely subject. The AI is not perfect.
This selected sky has a blue overlay. But Lightroom’s AI got a bit confused in the upper right-hand corner around the outer tree branches.
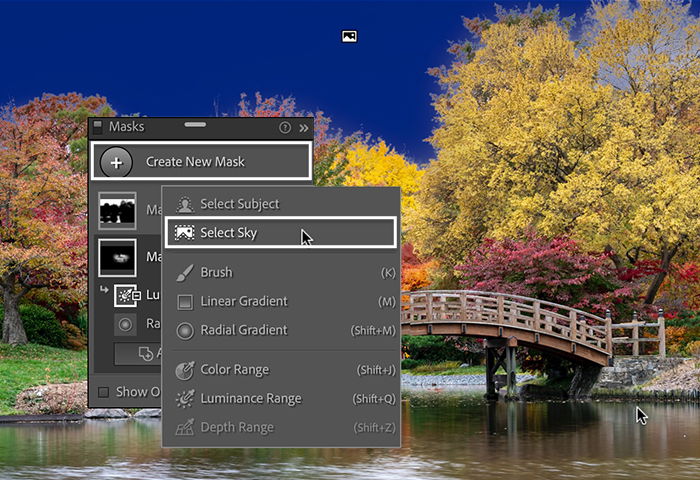
But overall, the results are pretty good, and the process is quick. In this image, the AI correctly identified the bridge as the main subject.
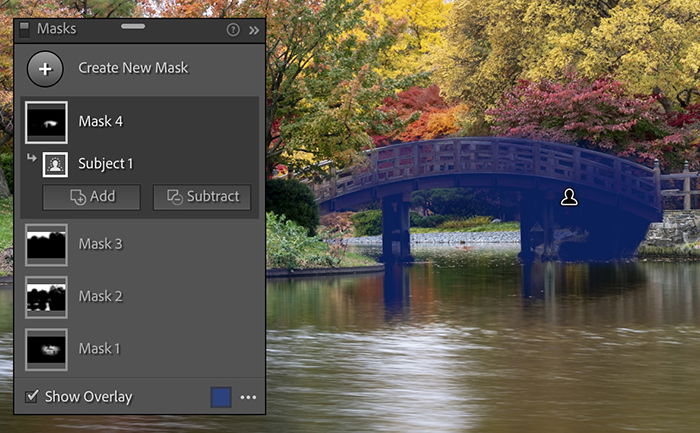
You can refine masks using the Add or Subtract buttons and the Brush tool. Plus, you can invert both Subject and Sky selections… you may find yourself using the legacy tools less and less as you see these tools in action.
Conclusion
The selective edit tools in Lightroom became much more powerful and integrated with the 2021 update. The layers panel will look familiar to Photoshop users. But it’s maybe new for some photographers.
The tools interact seamlessly, giving you what feels like an infinite amount of control over your selection. You still have the familiar selection tools available. But the Range Mask tools no longer serve a supporting role. They are now fully functioning selection tools. But the most exciting changes are the new AI-based masks.
It will take some practice to make new workflows part of your photo editing routine. But the time and effort are worth it. Once you get used to the new Lightroom masking updates, there are some new features you won’t be able to live without.
Try out our Shooting Skies e-book to take stunning photos in any weather!

