
Adobe Lightroom comes with a variety of brushes and masks that you can use to improve your photos. In this tutorial, we will show you how to use Lightroom brushes and masks to improve your photos.
What Are Lightroom Brushes and the Adjustment Brush in Lightroom?
The Lightroom “brush” tool is called the Adjustment Brush. It acts like a paintbrush to mask out and work on a specific area of an image.
You can use this brush to make a variety of changes to a specific part of your image. For example, when you want to whiten the teeth or enhance eye color in a portrait.
It gives you control over what you want to isolate.
You can use this brush together with other tools to make localized changes to your image.
The shortcut for the adjustment brush is K. You can activate it in any of the Lightroom modules.
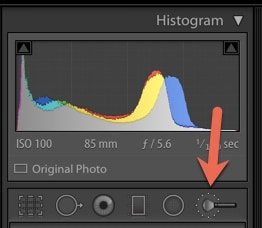
You can find it in the Basic panel under the Histogram. Simply click on the brush icon to activate it.
To change the size of the Adjustment Brush you can use the left and right bracket keys. Use [ to make the brush smaller and ] to make the brush larger.
You can also simply scroll with your mouse.
For incremental adjustments, you can click on the numbers in the brush parameters that indicate Size, Feather, Flow, and Density and manually type a new number in.
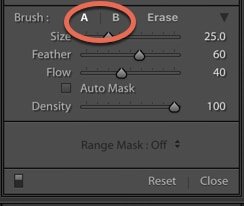
A & B Brushes
Notice in the Brush panel that there is something called the A and B Brushes.
Sometimes you need more than one size of brush when working on any given image in Lightroom.
The A + B Brushes allow you to make presets of brushes that you use very often. For example, a soft-edge brush and a hard-edge brush.
Or you can set them at certain levels of opacity, which is referred to as flow in Lightroom. This controls the rate of application of the adjustment.
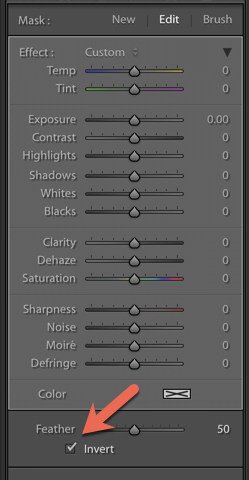
Note that the Feather slider helps create a soft-edged transition between the brushed area and surrounding pixels. The distance between the inner and outer circles represents the amount of feather applied.
The Density controls the amount of transparency of the brush strokes.
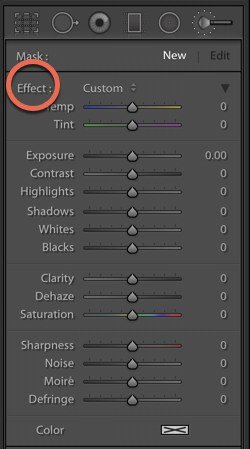
After you have brushed in a particular set of edits, click New on the top right of the Brush panel to create a new brush.
All of your sliders will remain unchanged. Double click on Effect to set everything back to zero.
Erase Tool
The Eraser Tool is just what it sounds like. It’s used to erase adjustments you have made to an area for a more precise application.
For example, you can erase portions of a Graduated Filter that you have applied to an image.
To change your brush from an adjustment brush to an Erase tool, simply press Option on a Mac or the Alt key on a PC.
You can use the eraser brush with the same shortcuts for size mentioned above.
Adjustment Brush Effects
Lightroom already has some presets of adjustment brushes and you can even purchase additional presets from third-party providers. These are great for portrait retouching.
You can buy presets that will help you whiten teeth and make cheeks and lips rosy, for example.
To access these brushes, click the dropdown next to Effect in the Brush panel while the adjustment brush is activated.
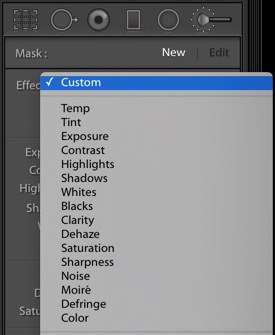
To make adjustments by dragging the sliders or clicking on Effect to activate the pop-up menu.
Here are how the various sliders will affect the specific area of your image when you apply them using the brush tool. You can use as many of these together as you like.
Temp – adjusts the color temperature to be cooler (blue) or warmer (yellow)
Tint – compensate for green or magenta color casts by adding the opposite colour
Exposure – sets the brightness of the tones in a specific area of the image
Highlights -recovers lost detail in overexposed highlight areas
Shadows – recovers lost detail in underexposed shadow areas
Whites – adjusts the white points
Blacks – adjusts the black points
Contrast – adds contrast to the mid-tones
Clarity – increases local contrast
Dehaze – reduces or increases any haze in the image
Sharpness – enhances edge definition to bring out the details in the image
Noise – reduces grain/luminance noise
Defringe – removes color fringing along edges
Color – used to apply a tint to a specific area of the image
When you are working with the Adjustment Brush, make sure you are applying precise brushstrokes so you do not affect other parts of your image unintentionally.
Don’t forget to apply feathering or density values that make sense with your subjects.
Some Tips
- You can adjust the sliders at any point in your editing process;
- Multiple brushes can be used to create layers that will allow you to go beyond 100 density;
- You can use it to create local luminance adjustments or adjustments in hue;
- To delete a brush, make sure it is highlighted with the black circle in the center and hit the Delete key
Brush Shortcuts
Getting familiar with the keyboard shortcuts in Lightroom will save you lots of time. Here are the main ones for the adjustment brush.
K – open/close the adjustment brush tool
H – hide/show pins
[ and ] – to adjust the size of the adjustment brush
O – show/hide the overlay
Shift + O – to cycle through a red, green, or white overlay
Alt/Option – change the adjustment brush to an eraser
Ctrl Z/Command Z – to undo adjustment history
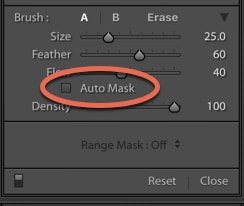
Auto Mask
Auto Mask is a feature that helps you target specific areas of your image and keep the brush from spilling over into areas you don’t want to affect.
It can be found when the adjustment brush, graduated filter or radial filter are activated. The Auto Mask works the same, regardless of which tool you’re using.
After you use one of these tools to make an adjustment to your image, use a brush with the Auto Mask feature checked on to include or exclude any part of the photo by painting over it.
The + inside the tool brush functions as your guide. Be sure to keep it on the area or tones you want to edit.
The New Range Mask Tool
The Range Mask tool is a new feature that came out Lightroom Classic CC 2018.
In the past when you wanted to make adjustments to areas containing the same color or tone, you had to paint them individually.
With the Range Mask tool, you can apply it at once, which really speeds up your editing process.
In Lightroom, there is sometimes more than one way to approach an edit. The Range Mask tool can be one approach that can help you increase the efficiency in your workflow and make more precise local adjustments for greater creative control.
There are two ways to apply the Range Mask: there is the Color Range Mask and the Luminance Range Mask.
Let’s look at these individually.
Color Range Mask
The Color Range Mask limits the local adjustment tools to a range of colors or tones.
You can find it in Radial Filter, Graduated Filter, and Adjustment Brush. It will be greyed out until you select make a local adjustment to your photo.
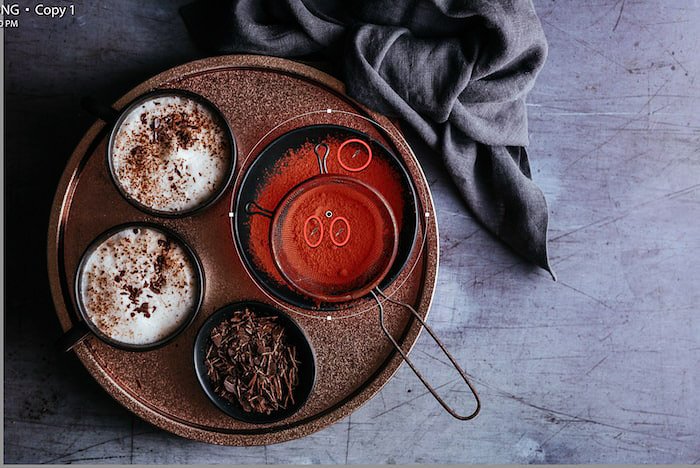
In the image below, I found the cocoa powder was reading too orange. I wanted to desaturate the color and make some other adjustments to the tones in this part of the image.
I began by making a quick, initial masking selection with the Radial Filter tool. You always want to think which tool will be suited for the task.
For example, if I wanted to work on the background of this image and make it look less blue, I would have chosen the Graduated Filter.
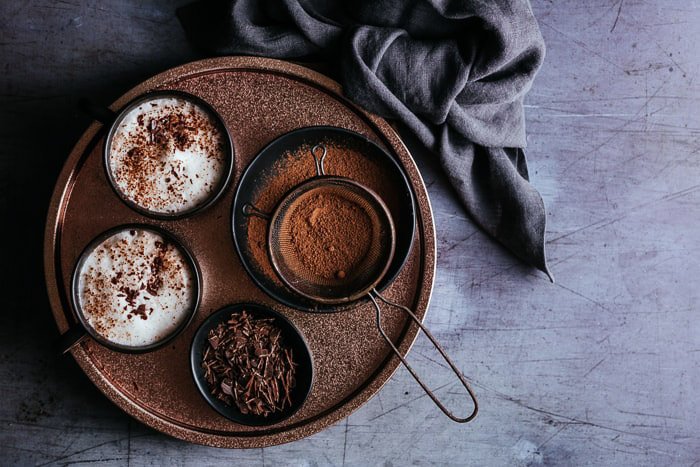
I chose the Radial Filter and made a selection of the bowl with the cocoa powder.
I checked off Invert.
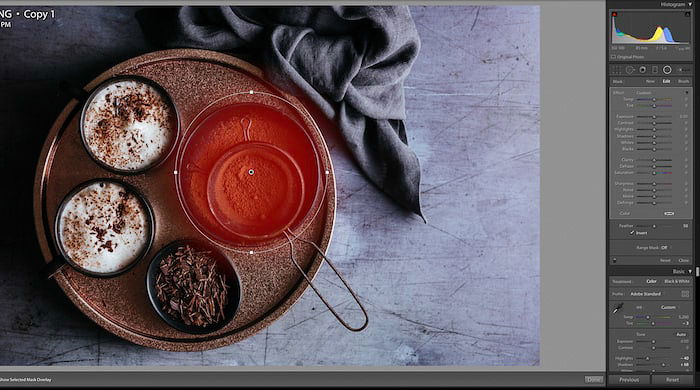
Now since we just want to affect that certain color, we head over to the Range Mask Tool and select Color.
Then we select the Eyedropper Tool to assist in choosing the colors or tones that we want to target.

There are a couple of ways we can do this. We can click and drag on the color to select and area, which will be signified by a white box.
Or you can hold Shift + click on the areas you want to affect.
Once I have made my color selection, I can adjust the sliders as needed.
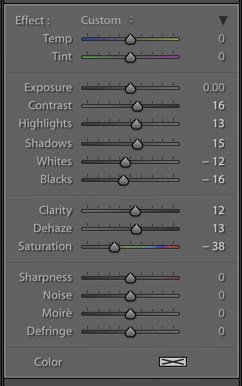
I brought the saturation down and made adjustments to the contrast, highlights, shadows, whites and blacks.
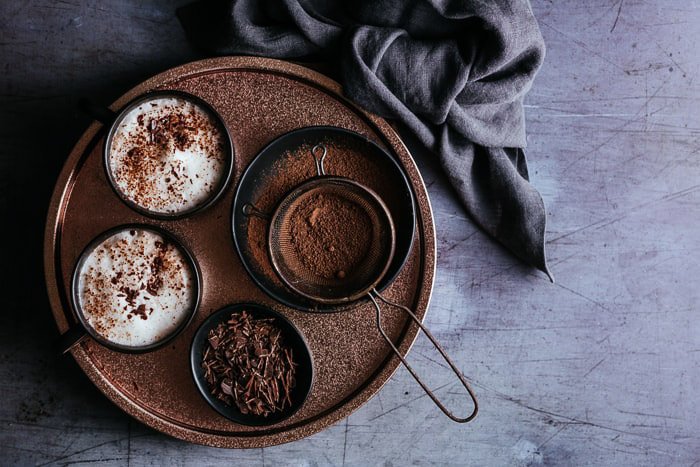
Now my cocoa isn’t as orange, but I have retained the copper tone of the tray.
Luminance Range Mask
The Luminance Mask applies local adjustments to a chosen area based on the brightness range of pixels that you select. For example, you can apply a local adjustment to the highlights or shadows
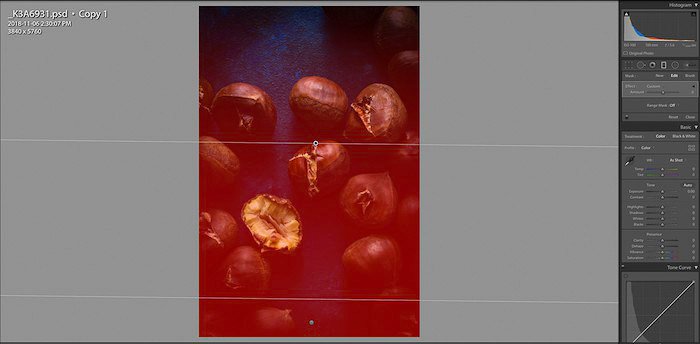
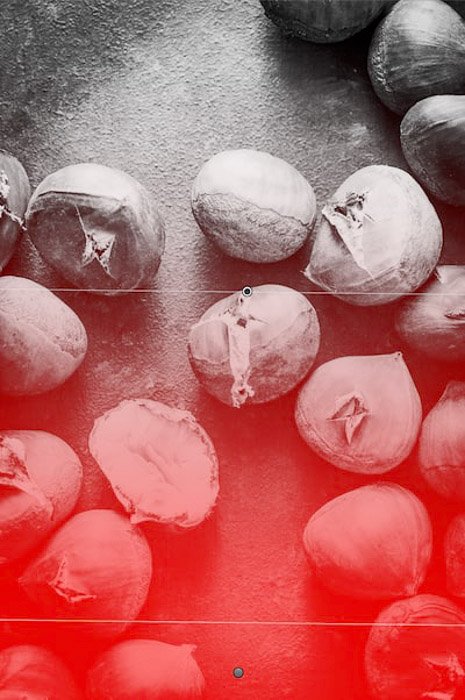
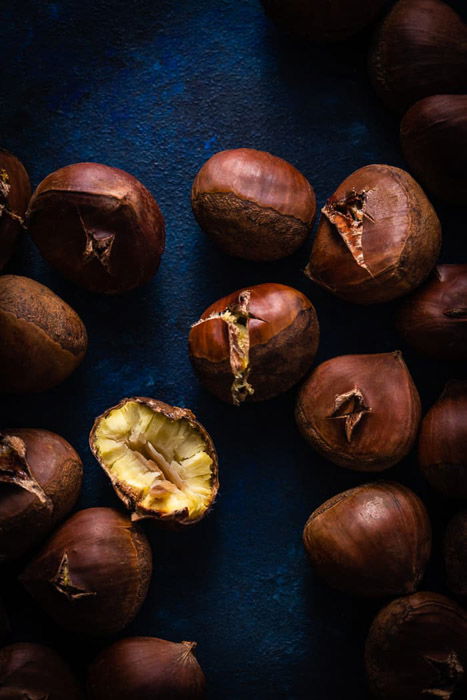
Here I chose the graduated filter to work on the luminance in a close-up shot of chestnuts.

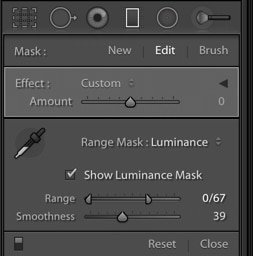
Select the Eyedropper fromt he Range Mask Panel. Click and area on the photo you want to adjust. This tool is an option shortcut to refine the Range slider.
Check off Show Luminance Mask to view the luminance information in a black and white representation.
The red area shows the actual area masked, which is where the luminance and local adjustment has been applied.
Use the Smoothness slider to adjust how smooth the falloff is at either end of the luminance range.
And here is the final image.
Conclusion
Many people think you need Photoshop to make localized adjustments to your image, but you can quickly and easily do a lot with brushes and masks in Lightroom.
The next time you edit your pictures, play around with these tools to see how various local adjustments can enhance your images and give you more creative control over your results.
![]()
![]()
![]()
![]()

