If you’re like most photographers, your Lightroom catalog is the lifeblood of your business. It contains all your photos, keywords, develop presets and more. So it’s important to make sure it’s backed up and safe. But how do you transfer a Lightroom catalog to a new computer?
That’s where the Lightroom Catalog Transfer Tool comes in. This handy little tool makes it easy to transfer your entire catalog from one computer to another. All you need is a USB drive or SD card. Here’s how to do it:
1. Preparing Your Folders to Transfer a Lightroom Catalog to a New Computer
Here’s what you need to do before installing Lightroom on the new computer. You’ll want to make sure that you have things in order on the back end.
The first step is to look at your folders in Lightroom. Organize them in a clear hierarchy so that they’ll be easier to find later on.
Your new computer might not automatically find your photos and you’ll need to relink them.
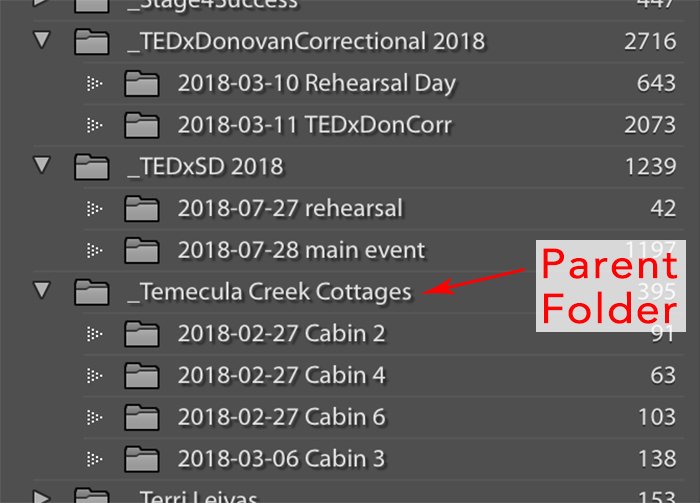
Don’t worry if you haven’t organized your folder before, though. It’s simple to do! Right click on a folder and select “Show Parent Folder”.
The parent folder will appear. It’ll show you the hierarchy of folders that lead you to where the photos are actually stored.
You might go too far up in the parent folders. You can always click on “Hide This Parent” to hide that particular parent folder.
Go through your folders until you have a clear organization shown in Lightroom. Once you’ve done that, you’re ready for the next step!
2. Back up everything
As with any big change in software or hardware, you’ll want to back up files and settings before any changes. Lightroom has a hefty list of items you’ll want to back up, so let’s look at each one.
- Your photos. You should already be backing up your photos. But be sure to do a backup right before making this big switch so that all your latest image files are safe. If you’re not sure where a particular set of photos is stored, right-click on the folder and select “Show in Finder”.
- The Catalog. This is where Lightroom stores all the info about photos you’ve imported and worked on. This is where all your hard work is saved! The file has an .lrcat extension and you can find your Lightroom catalog location here:
- Mac: Macintosh HD / Users / [your username] / Pictures / Lightroom / Lightroom Catalog.lrcat
- Windows: C: Users [your username] My Pictures Lightroom Lightroom Catalog.lrca. If you don’t find it in those folders, you may have changed the location of the Catalog file at some point. You can find the current catalog file location by going to Lightroom Classic > Catalog Settings > General Tab. If you want even more help, click on “Show” and it’ll take you to that folder in Finder!
- Catalog backups. In the same folder as the catalog file, you’ll see a subfolder with the backups. Lightroom automatically does backups of your catalog. It would be wise to have a backup of your current catalog, your catalog from six months ago, and your catalog from one year ago.
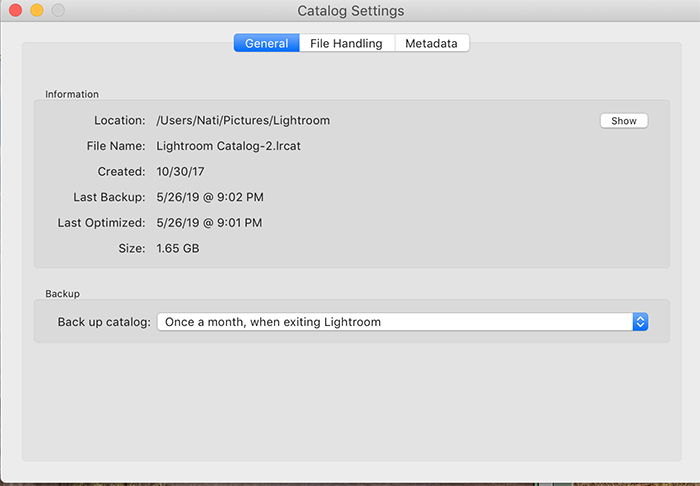
- The previews. If you’re able to back up your previews it’ll save you time in rebuilding them on the new computer. It’s not a great idea to back them up regularly since the files are large. You can find the previews in the same location as your catalog.
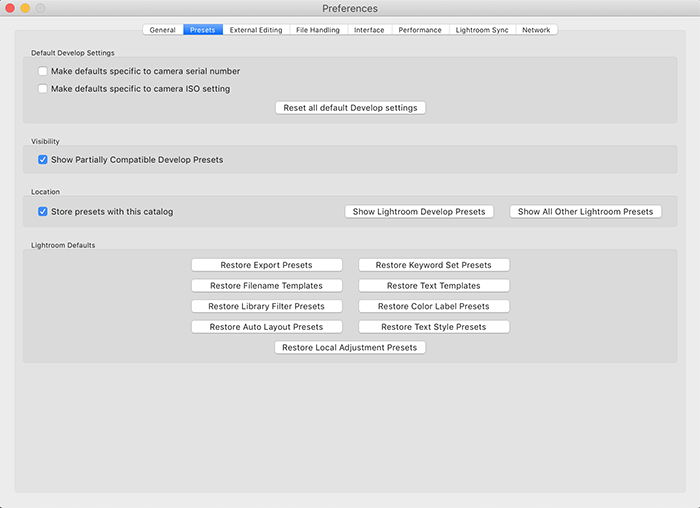
- Templates and presets. Whether you use purchased presets or have created your own, it’s important not to lose those files! Backup all your presets and templates. This includes export presets, develop presets and brushes, print or web templates, and metadata templates. To find where your presets are getting saved, open your Lightroom settings and go to the Presets tab. If you’ve checked the box for “Store presets with this catalog”, then you should see the presets saved in the same folder as the catalog. If the box isn’t checked, then go ahead and click on “Show Lightroom Presets Folder” and it’ll take you to it in Finder. The default locations for presets are:
- Mac: Macintosh HD / Users / [your username] / Library / Application Support / Adobe / Lightroom /
- Windows: C: Users [your username] AppData Roaming Adobe Lightroom
- Preferences. If you back up your preferences it’ll save you from having to take time to set them all again. You can find the preferences already saved for you in one file! In the following folder locations, note that the file will show your current version of Lightroom. The actual file name will change with each update. The default locations for preferences settings are:
- Mac: Macintosh HD / Users / [your username] / Library / Preferences / com.adobe.LightroomClassicCC7.plist
- Windows: C: Users [your username] AppData Roaming Adobe Lightroom Preferences Lightroom Classic CC 7 Preferences.agprefs
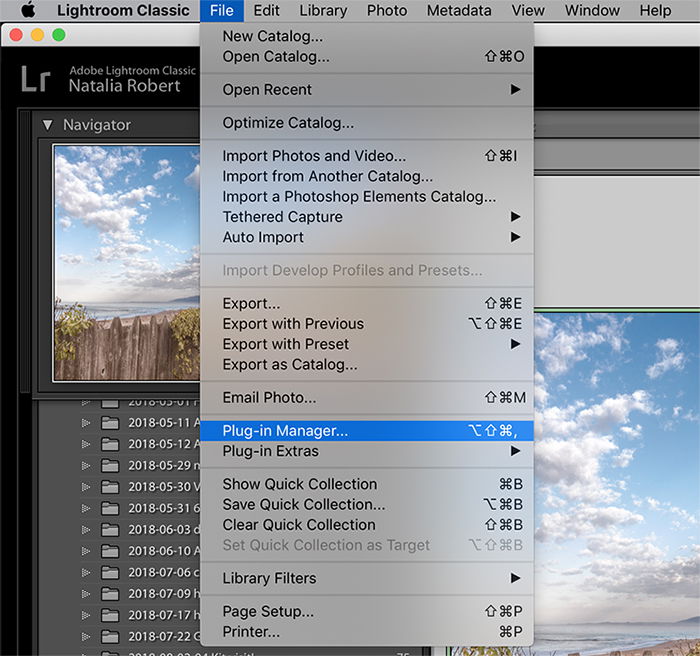
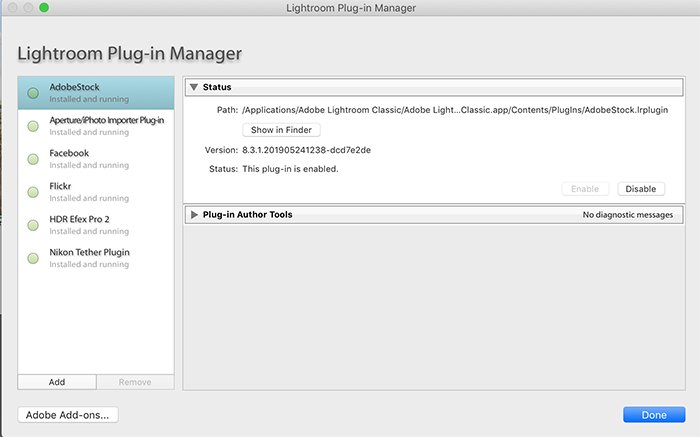
- Plug-ins. If you have any plug-ins installed, it’s wise to back those up and take them with you into the new computer install. To find where your plug-ins are stored, go to File>Plug-In Manager and it will have a list of your plug-ins. Click on each one in the left column, and the top of the right column will show the path. Again, you can click on “Show in Finder” for Lightroom to take you straight to that folder in Finder!
- Your serial number (if you’re not a Creative Cloud subscriber). If you happen to have an older install of Lightroom, it might have a serial number. You’ll want to make sure to keep that number handy. If you registered your copy with Adobe, you can log in to your account. You’ll ind the serial numbers under “My Products and Services”. If you happen to have the original discs, you can most likely also find the serial numbers on the packaging.
3. Install Lightroom on the New Computer
Now you’re ready to install! If you have an older copy that’s on a disc, you can install with the same disc you used originally.
You’ll need your product’s serial number to re-install Lightroom.
If you registered your older product with Adobe or if you’re a subscriber, you’ll go straight to the Adobe website on your new computer.
Log in to your account, and you’ll be able to access any of your products, along with their downloads.
4. Transfer Files to the New Computer
Next, you’re going to transfer all those files you backed up onto your new computer.
Be very mindful of putting them in the same paths as the original location. This way Lightroom can easily find them again.
If you’re switching platforms, like going from Mac to Windows or vice versa, you’ll want to take note of the paths for the files in your new platform.
5. Open the Catalog on the New Computer and Relink Any Missing Files
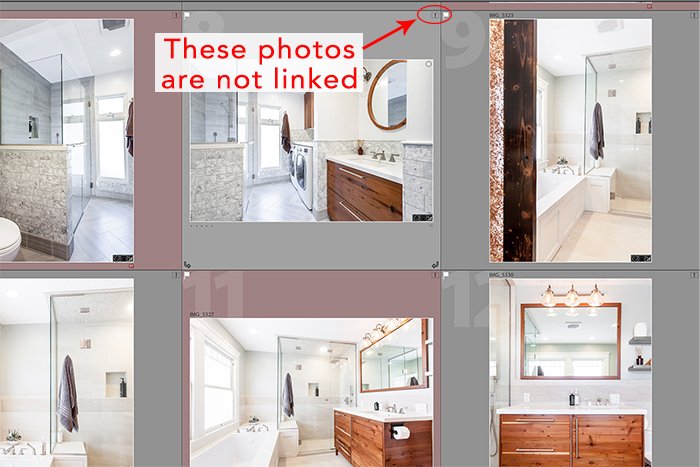
Before starting up Lightroom, go to your catalog file and double click on it to open that catalog. Once open in Lightroom, take a look to see if any photos are not linked.
If photos are not linked, you’ll see a question mark or exclamation point in the top right corner of the photo square.
When you see a missing photo, navigate to the parent folder for that photo in the left column. With the cursor over that parent folder, right click and select “Find Missing Folder”.
This will open a Finder window where you can go to the correct folder location and select it. This relinks that folder with the photos in Lightroom!
6. Check Preferences, Presets, and Plug-ins
The last step is to review your presets, preferences, and plug-ins to make sure they’re all there!
If you see anything missing, confirm that they’re in the correct folder or reload the plug-in and you’ll be all set.
Conclusion
Moving Lightroom from one computer to another can seem like a difficult task. But it can be broken down into simple steps!
Follow the above steps and pay attention to where files are saved. You’ll be back to editing in no time at all.
Why not check out our articles on using Lightroom mobile or how to make a watermark in Lightroom next!

