Editing your landscape images in Lightroom is easy and fast. We’ll walk you through everything you need to know about how to edit landscape photos in Lightroom.
How to Edit Landscape Photos in Lightroom
Before starting to edit your landscape photos, you need to ensure you are in the “develop” section of Lightroom. Click the tab on the top right to get started.
Lens Corrections
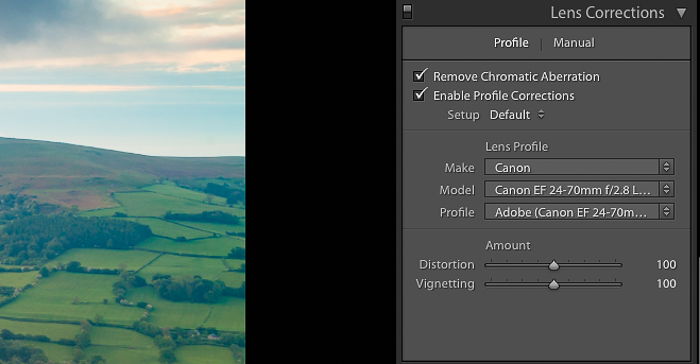
A good starting point is the lens correction function. It is located near the bottom of the right-hand panel. You may not be aware but whenever you take a photograph with any lens, there is some distortion and errors that occur.
For example, this might be chromatic aberrations, vignetting or slight warping of an image. This is where straight lines begin to look a bit curved. But there is an easy fix in Lightroom that will correct this in the vast majority of cases.
First tick “Enable Profile Corrections”. Once you do this, you should see the drop-down menus below it, fill with the details of your lens manufacturer, model, and profile.
If you don’t see your lens already populated in the box, click the arrow on the boxes and select the relevant ones from the drop-down menu. Once these are in the boxes will see a slight change made to the photo.
Some older lenses or specialist lenses might not be in the drop-down menu. You would then have to manually adjust the sliders below the boxed named “Distortion” and “Vignetting” to correct the image.
Another good tool in the lens correction panel is the “Remove Chromatic Aberration“.
Correct the White Balance
When we look at a scene during midday, for example, our eyes automatically adjust so that we see a clear picture with no tint. Camera sensors cannot make that adjustment.
What often shows up on a photo taken in bright sunshine is a blue tint. So in other words white balance is the temperature of the photo. Not correcting the white balance makes landscape photos look unnatural and dull.
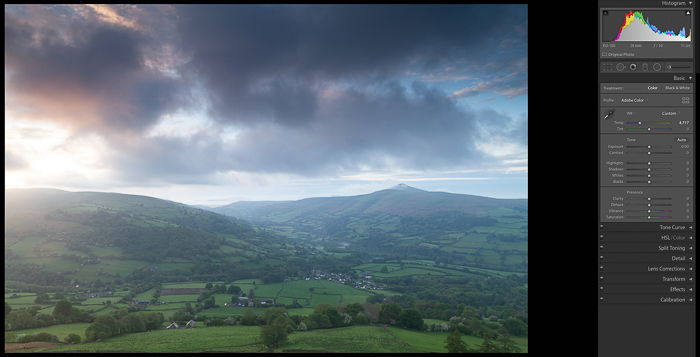
You can either adjust your balance at the time of taking the photo. Or if you are using RAW files you can adjust the temperature in Lightroom.
At the very top of the right-hand panel (below the histogram), you will see a couple of sliders titled “Temp” and “Tint”. Move the sliders along to get an image that feels natural to you.
If you click on the small arrows named “As shot” you will get a drop-down menu of the different custom settings you get in your camera. In the same menu, there is also an “Auto” option.
Another option is to use the “White Balance Selector” tool which looks like an eyedropper. Click on it and then select somewhere on your image where there is a neutral color like grey.
The white balance will change accordingly. You can then still make any tweaks to the white balance using the sliders.
Make Your Image Pop Out in the Presence Panel
The next part of your Lightroom landscape editing process is where you can transform your images and make them look stunning.
The order that you do these Lightroom edits will come down to your own workflow. These are the steps that I go through on my Lightroom landscape edits.
Clarity
The clarity slider works by adding or removing contrast to edges found in your image. If raised, it can bring out textures in the photo and also make it seem sharper all over.
Reducing the clarity has the opposite effect of making your photo seem less sharp. Drag the clarity slider to the right until you get a natural, sharp-looking image with good contrast.
Vibrancy & Saturation
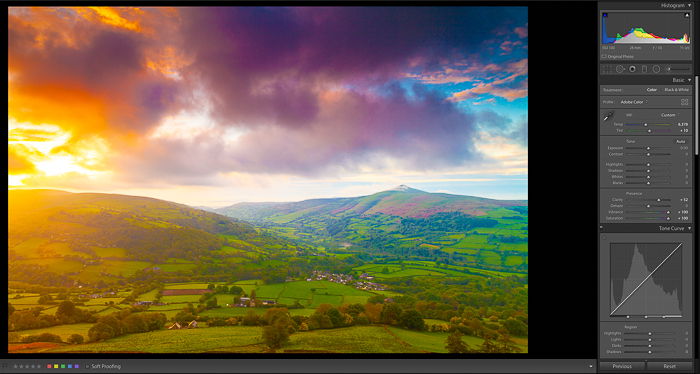
Increasing these two sliders adds more color to your image. Generally, if you take photos in RAW format you will find the colors dulled down.
Move the sliders along to bring out the color in the landscape. But be careful of overdoing it as too much vibrancy or saturation will make the image look fake.
Dehaze
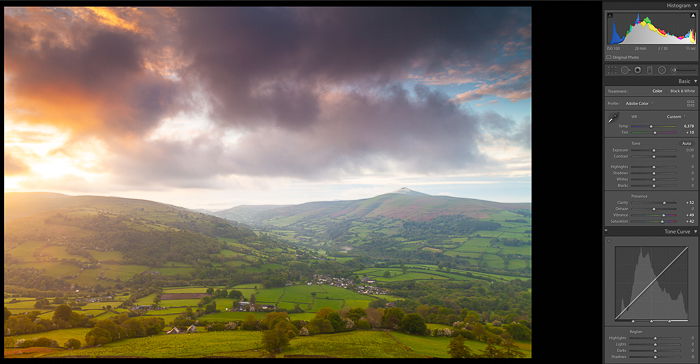
This slider was a great addition to Lightroom and produces great results in landscape photos. It helps to remove some of the haze in your photo.
Increasing the slider will begin to make your photo look darker with more detail showing. Not every landscape photo needs you to use the dehaze slider.
For example in winter generally the air will be crisper and you will have less haze. Or it could be that the haze in your image adds to the ambiance.
In some situations, this slider can bring out the details in your landscape photos.
Exposure
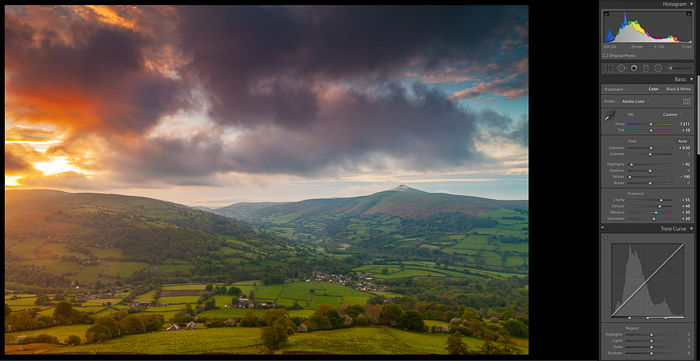
By increasing the clarity and moving the dehaze slider to the right, your image will often start to look a little dark. So next is the exposure slider.
Again move your slider to the right so that you are making your image brighter but be aware of clipping your highlights.
This is where your highlights are so bright that they are pure white and contain no pixel detail.
Highlights & Whites
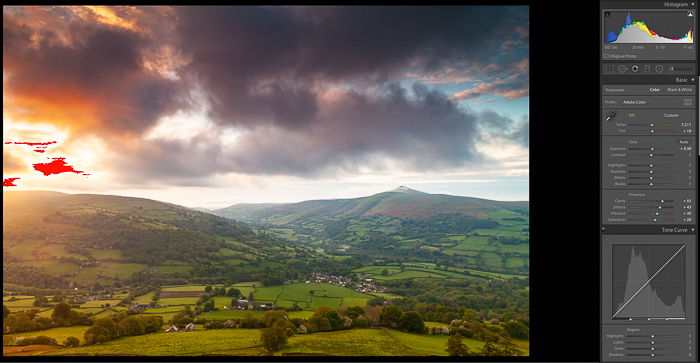
Increasing the exposure in your photo will sometimes mean that some areas are clipped. In a landscape photo, these will generally be in the sky and usually near the sun.
Lightroom has two great tools to help you see where clipping is happening. The first is by clicking the small arrow in the top right corner of your histogram. If there are any parts which are blown out (clipped) these will be highlighted in red.
You can now adjust your highlights and whites sliders to recover these areas. As you move the sliders to the left you will see the red areas disappearing.
The other option to find and recover clipped areas is by holding down the “alt” key on your keyboard and sliding the highlights or whites sliders.
You will notice that the image will temporarily turn black/colored with the areas that are clipped showing in white.
As you move the sliders to the left, the white area will start to disappear. The one issue that you will notice is that the sliders apply the correction to the entire image.
If the area affected is small, sometimes you will have a situation where the whole image will look too flat. There is another option of only targeting the area that is clipped using the burn or dodge tool.
Shadows & Blacks
In the same way that some areas of your image might suffer from clipped highlights, there could also be areas of clipped shadows.
Click the small arrow on the top left of the histogram and you will see any clipped dark areas highlighted in blue.
Using the shadows and blacks sliders you can recover these areas. As per the highlights and whites, holding down the “alt” key will turn the image white with any clipped areas showing in black or colors.
Keep in mind that in extreme cases you will not be able to recover these areas that are clipped.
Contrast
By this point, your image should be looking much more vibrant and devoid of any clipped areas. But it might also lack some contrast due to the adjustments made.
A great landscape photo needs contrast to avoid it looking flat. Move the slider along until you get a good level of contrast in your image.
Tone Curve
You can use the tone curve tool to further tweak all the aspects of your landscape photo. Usually, for landscape photography, a slight “S” curve in the graph will give a pleasing result. There is no general rule and for some images, it will not work.
Play around with the sliders making small tweaks to see if you can improve your photo.
You may find at any point during the steps above that you need to make subtle changes to other adjustments you’ve made along the way. This is because every change impacts previous ones.
By adding contrast you’ll find that some clipping has re-appeared. Don’t be afraid to tweak other settings as you are editing.
Graduated Filter
The graduated filter tool in Lightroom mimics the effect of a graduated filter.
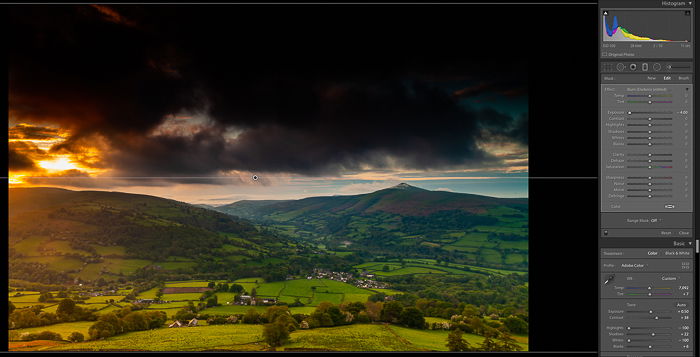
Once you have clicked on it you can drag a set of three lines across your image. If you hold “shift” while dragging it will ensure that the lines will stay locked in a straight horizontal or vertical position.
The top half of the image will now be adjusted with any tweaks you make on the panel on the right.
The tweaks will fade away into the bottom half. So if you wanted a darker sky, you can make the adjustment without changing the lower half of the image. The great thing about this tool is that it doesn’t have to be for exposure only.
You can add saturation, clarity and even adjust the temperature of only the top on the image.
Adjustment Brush
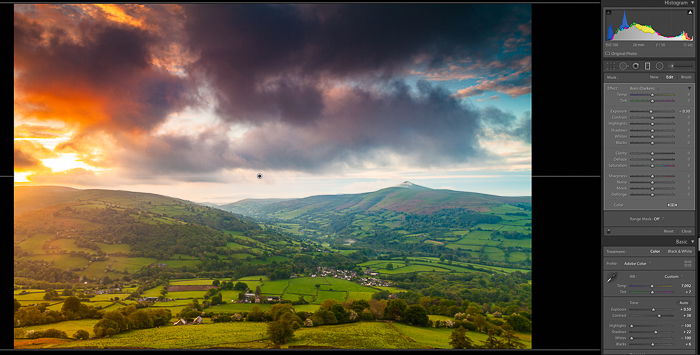
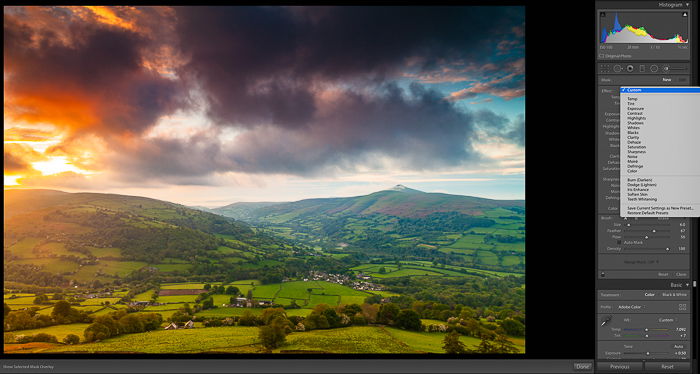
This useful tool takes the ability to selectively adjust a part of the image to a whole new level. You can use this to target very specific areas of your photo.
There is a default list of settings that you can use or you can move the sliders to create your own.
Earlier in this article, I mentioned dodge and burn. You may find that after all these adjustments you still have a part of your sky which has clipped areas. Instead of having to adjust the entire image why not tweak only the affected area.
Select burn and your cursor will change to a circle with a plus sign in the middle. If you then click on the small arrows on the left corners of the histogram you will get your clipped areas highlighted.
Then brush over the red areas (i.e. clipped highlights) until they disappear. Similarly, choose “dodge” to do the same with black areas.
You can use this tool to selectively adjust even the smallest parts of an image. Boosting saturation, contrast and even sharpness can be done to the minutest of details.
Tweak Your Colors
The next step in the editing process is adjusting individual colors. Lightroom allows you to boost or reduce saturation and luminance of colors on an individual level.
This can be useful in a landscape photo where you may wish to increase the saturation in the sky’s blue. But you want the keep the foreground greens unchanged.
Use the saturation tool to boost or reduce colors so that your shot looks vibrant in the right places. The luminance tool will darken or brighten individual colors.
Transform Your Image
In any landscape photo, one of the most critical Lightroom edits you need to do is to level your horizon line if it isn’t straight.
Transform
Lightroom has a couple of easy ways to straighten your photo. The first in in the “Transform” section near the bottom of the right-hand panel.
At the top of this section, you will see six boxes named: Off, Auto, Guided, Level, Vertical, Full.
Each of these is a preset that adjusts the image to correct things like converging lines, perspective, and balance level. Clicking on one of these should, in theory, straighten your image.
The “Auto” option will usually work pretty well for most photos. If it doesn’t, try the other options.
In some cases, none of the options will work. You will need to manually manipulate the photo using the transform sliders to be able to straighten your horizon line.
Crop Your Image
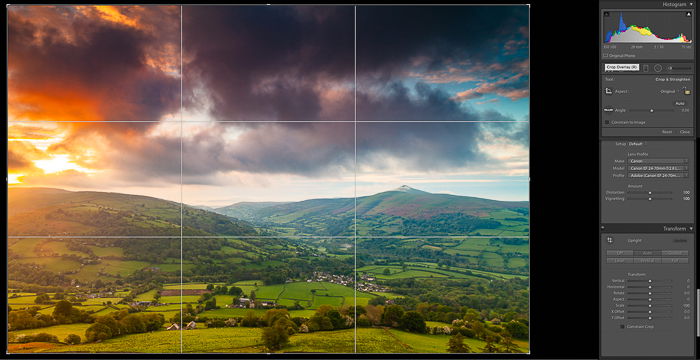
Sometimes the difference between a good photo and a great one is how you crop your image. You should take some time to try different crops to see if it improves your photo.
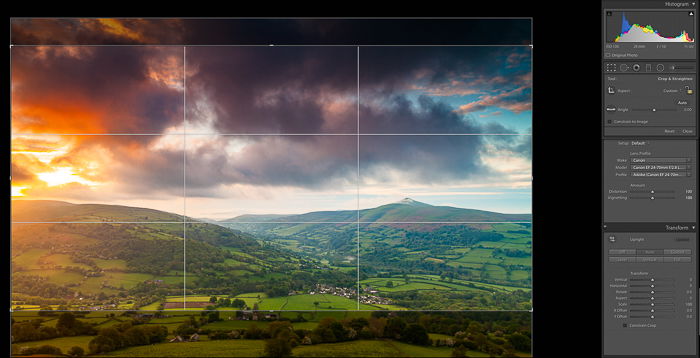
At the very top of the right-hand panel, under the histogram, you will see the crop overlay tool.
Once you click this some guideline will appear on your image. If you press “O” on your keyboard the overlays will change to give you different options.
The most common overlay to use for landscape photography is the rule of thirds. This composition technique allows you to place points of interest at the points of intersection. This will help give the photo a balanced look.
With the rule of thirds overlay selected, move the edges of the guides to crop your image. The great thing about Lightroom is that it is non-destructive.
Whatever changes you make to an image can be undone at any time. Play around with the crop until you have something that you feel works.
Noise Reduction
Sometimes you may find that your photo has a bit too much noise. This would generally show up in dark areas. Lightroom’s noise reduction tool works very well in reducing the noise in photos.
Keep in mind though that you should only use a small amount of noise reduction and only if the photo needs it. Too much noise reduction and the photo will lack sharpness which landscape photos need.
If you have used a low ISO and have exposed your photo correctly then there shouldn’t be any need for a lot of noise reduction.
Sharpening Your Photos in Lightroom
My personal preference for sharpening a photo is to use Adobe Photoshop rather than Lightroom. The “High Pass Filter” option on Photoshop offers a much better sharpening method than the sliders in Lightroom.
If you don’t have access to Photoshop, only add subtle sharpening. Too much sharpening and your photo will begin to show artifacts like halos.
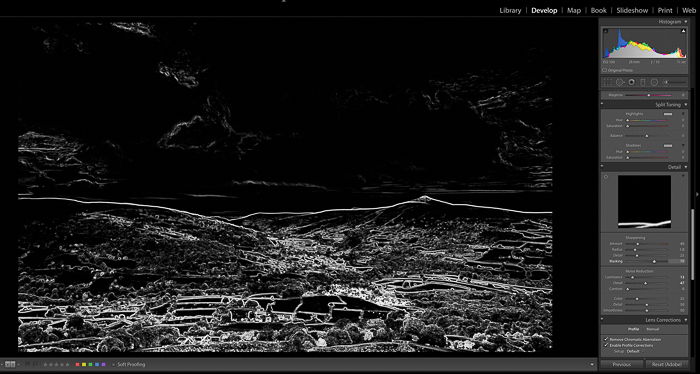
A useful tool when sharpening landscape photos is to hold the “alt” key on your keyboard and move the “Masking” slider along. Notice how the whole picture turns black and there are just some white outlines.
This slider adds a mask to your photo to only sharpen the bits that are white. In other words, edges only.
The more you pull the slider along the more masking is added to the photo. The reason that this is useful is that in landscape photos you don’t need to sharpen things like the sky or water.
Especially if you have used a slow exposure to show movement. So by masking these areas, you are able to sharpen the details only.
Adding a Vignette
The very last edit that you may choose to add to your landscape photo is a vignette. It will be personal preference and will depend on the photo. But a subtle vignette can help bring focus to the center of the photo.
The vignette sliders are situated in the “Effects” part of the right-hand panel. Experiment by moving the sliders to see the differences in the vignette until you find something that works for your image.
Remove Dust Spots
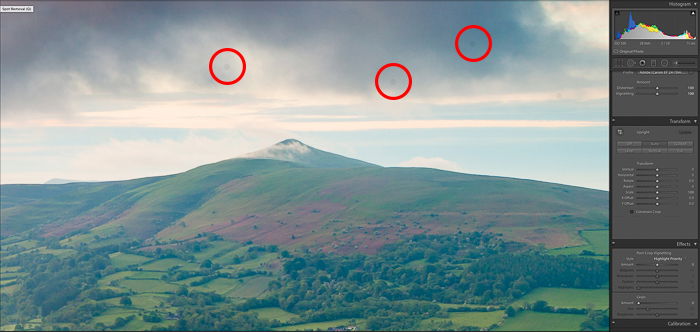
The very last check to run on your landscape photos is to remove dust spots. Zoom into your photo so that you are viewing it at 1:1 ratio (i.e. 100%). Scan the entire image looking for spots which show up as black circles.
Use the spot removal tool (situated under the histogram) making sure that “Heal” is selected. Move the circle over the spot and click to remove it. Lightroom will select a point to copy from and to paste onto the spot.
Sometimes that might not be the correct place so you’ll have to move the circle that shows where it’s been copied from to somewhere else.
Conclusion
There you have it, a great guide on how to edit landscape photos in Lightroom.
You don’t have to follow these steps in the order above. In time, you’ll create your own Lightroom workflow to suit your style and your needs.
For more great editing tips, check out our article on how to change aspect ratio in Lightroom next!
